
Season of the Wish not only brings exciting new Seasonal activities but also a new Destiny 2 dungeon to plunder. With a great setting and a suite of new Warlord’s Ruin armor and weapons to collect, including a new Exotic, you’ll want to know all about the Destiny 2 Warlord’s Ruin dungeon if you’re brave enough to dive in. That’s why we’ve put together a full Destiny 2 Warlord’s Ruin guide, complete with how to beat the bosses and the full Destiny 2 Warlord’s Ruin loot table of weapons and armor you’ll get for doing so.
There’s nothing more exciting than a new Destiny 2 dungeon, other than a new raid, of course. With some of the best combat encounters, environments, and story revelations in the entire game, the new Destiny 2 Warlord’s Ruin dungeon thankfully lives up to expectations. Only the foolish venture into a new dungeon unprepared though, so we recommend checking out the best Destiny 2 Titan build, Destiny 2 Hunter build, and Destiny 2 Warlock build so you’re ready for action right away.
Destiny 2 Warlord’s Ruin guide
Our Destiny 2 Warlord’s Ruin guide covers all three bosses and the handful of encounters in between to give you a full walkthrough of the new dungeon.
- Head up the mountain
- Rathil boss
- Prison cells
- Maze
- Locus of Wailing Grief boss
- Platforming
- Hefnd’s Vengeance, Blighted Chimera boss
Be sure to bring the best Destiny 2 weapons for PvE with you as there are strict damage windows you’ll want to keep up with. There’s also a handful of new Destiny 2 Season of the Wish weapons you can collect which are strong contenders and require you to journey into Riven’s Lair or the Destiny 2 The Coil activity.
Starting Warlord’s Ruin
Once you spawn into the Warlord’s Ruin dungeon, continue forward to scale the mountain. This involves a short jumping puzzle, leaping between various rocky outcroppings. Keep an eye out for red flags to guide your way, though it’s generally straightforward as to where to go.
Rathil, the First Broken Knight of Fikrul
The first encounter in Warlord’s Ruin is a boss fight against Fikrul. In terms of how to beat Fikrul, your goal is to break its immunity phase to be able to deal damage.
This involves standing within the small Scorn devices the boss creates when you see the text ‘Imminent Wish’ in the bottom left of your screen. These devices house a small Taken blight but, once cleansed by standing within its radius, will emit a blue glow. You have until the time runs out to cleanse as many of these devices as you can to increase the amount of time you have to damage the boss.
When you see the text ‘Rathil’s hex backfires’, that’s how you know it’s time to start unleashing all your firepower on the boss. You’ll only have a limited time before Rathil becomes immune again, so make sure you’re using your best gear for sustained damage, such as a heavy machine gun.
Occasionally Rathil will teleport you and your Fireteam into cells that slowly rise. Simply shoot all the Taken Eyes that spawn in the air to free yourself. We recommend shooting the Taken Eyes around your allies’ cages rather than your own, as these will be easier to see, therefore letting you destroy them quicker and continue with the fight.
Repeat this process until you’ve beaten Rathil, the First Broken Knight of Fikrul, at which point you’ll be teleported into the first puzzle.
Prison Cells
After being teleported, you and your Fireteam will be locked in prison cells in an area called the Windswept Crag. Each of you will be in a different cell, with the sole goal of escaping. But, how do you escape the prison cells?
Each player can see two circular devices on the walls, making for a total of six. Shooting these devices will cause them to spin, while shooting them a second time will make them stop, and activating them a third-time results in them spinning in the opposite direction. One player has a view of a key that can be shot after solving the puzzle to open the cells.
As for the correct puzzle solution, two players will find a skeleton pointing towards a large tablet with a white tally marking on it, giving you the clue you need. The direction the skeletons are pointing indicates the direction the devices on the wall need to rotate, with the tally marks indicating how many devices you need to spin in the given direction.
For example, if one skeleton is pointing to the left with two tally marks, and the other pointing to the right with four tally marks, then two devices must rotate to the left while the other four rotate to the right. The specific clue will change each time, though the process remains the same.
When all devices are rotating in the right direction, the player with a view of the key can shoot at it to activate the key and open the cells.
Hallway maze
After you’re free from your imprisonment, you’ll be let loose in a maze-like environment packed with traps. The path isn’t all that confusing, but it is treacherous. Remember to avoid the traps, including any chests that glow blue which are akin to mimic chests in the Dark Souls games.
Once you’ve emerged on the other side, you’ll find yourself climbing up to a large bridge area. Here, you can either fight the waves of Taken and Scorn or run past them.
Whichever option you take, you’ll need to jump along the cliff to the right to continue. Here, look for a circular opening in the cliff that leads you back into the fortress.
Locus of Wailing Grief
The second boss is the Locus of Wailing Grief, a Taken ogre that is invulnerable until you light four brazier pillars.
To do this, fight the waves of enemies until Taken Eyes spawn around the arena. Destroy these Eyes to spawn two Scorn minibosses, one on either side. Like the first boss against Rathil, these minibosses drop devices that you must stand next to in order to cleanse them.
However, it’s not quite so straightforward. Once these minibosses are defeated, the Biting Cold effect kicks in. When Biting Cold reaches ten, your team will wipe. To remove Biting Cold, run to the lit torches against the back wall where you begin the fight. During the damage phases, however, the braziers will cleanse you instead.
Depending on how many Scorn devices you cleansed, Solar orbs will spawn in the centre of the arena. Pick one up and take it to one of the braziers around the boss to light the pillar. Once all four pillars are lit, the damage phase will begin.
All players will want to group up at the last brazier you activate to deal damage until the fire runs out before moving on to the next brazier. If each player goes to a different brazier once all four are lit, they will activate at the same time, causing them to run out and cut your damage window short.
Repeat this process until you have defeated the Locus of Wailing Grief boss.
Platforming
After beating the Locus of Wailing Grief, follow the hallways until you emerge on the mountain. Continue up the cliff by jumping up the rocky platforms. It’s straightforward but rather time-consuming, though you’ll eventually reach the final boss arena at the top of the mountain.
Hefnd’s Vengeance, Blighted Chimera
The final boss of the Warlord’s Ruin dungeon is Hefnd’s Vengeance, the Blighted Chimera. This boss combines previous mechanics with one new one, so it’s not too hard to learn.
Hefnd’s Vengeance begins the fight immune, so making it vulnerable is your first step. To do this, defeat the waves of Taken until Taken Eyes eventually spawn. Destroy these to spawn two Scorn minibosses that will create the devices that you’ll need to cleanse by standing nearby. This is the same process as the previous boss.
The new addition is the Hex of Vengeful Corruption debuff which will wipe your team if it reaches zero. To remove Vengeful Corruption, melee a unique Scorn enemy called a Corrupted Hex-Drinker that is immune to all damage. Once you’ve done this, the Vengeful Corruption debuff will be transferred to them. Yes, transferred, not removed. These enemies can transfer the debuff back to you by attacking you. So, you’ll need to play tag with the Corrupted Hex-Drinkers to ensure you don’t wind up running out of time on the debuff and being wiped.
We recommend staying agile around a Corrupted Hex-Drinker so you can transfer the debuff when the timer gets low, but far away enough or mobile enough so that they can’t give it back to you.
Like Rathil, when the Imminent Wish timer reaches zero, it’s time to damage the boss. Group up and use everything at your disposal as you’ve only got limited time, though the more devices activated the more time you’ll have.
Once the first damage phase is over, your team will need to climb to the next platform and repeat the process until Hefnd’s Vengeance is defeated.
With Hefnd’s Vengeance dead, you’ve officially beaten the Destiny 2 Warlord’s Ruin dungeon. Well done, Guardian!
Destiny 2 In the Shadow of the Mountain
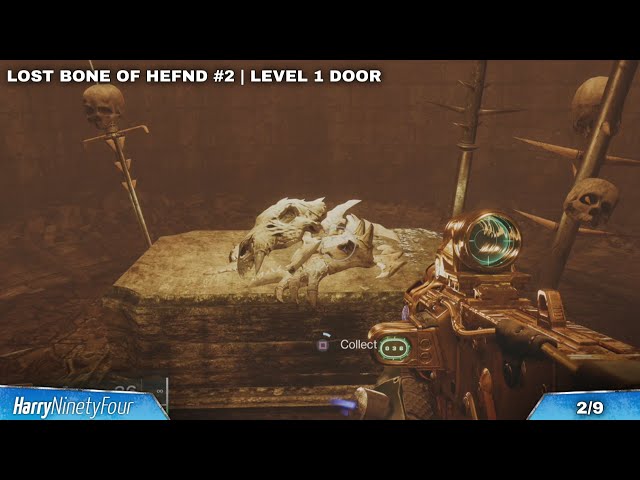
The Destiny 2 In the Shadow of the Mountain quest is the main quest for the Warlord’s Ruin dungeon, tasking you with collected Ahamkara bones, involving repeat playthroughs.
There are a total of ten Lost Bones of Hefnd to collect based on the following clues:
- Bone of Hefnd #1 – Found next to the chest after beating Hefnd’s Vengeance
- Bone of Hefnd #2 – Across the bridge inside the first fort, before an arresting Knight assails you.
- Bone of Hefnd #3 – Across from imprisonment, after ascending the ceiling.
- Bone of Hefnd #4 – At the top of the summit, face back from the cliff and find shelter.
- Bone of Hefnd #5 – In the snowfallen maze, through the broken wall, seek the banner of kings.
- Bone of Hefnd #6 – Cross into the Tempest, through the Portcullis, at the sewer’s mouth.
- Bone of Hefnd #7 – At summit’s base, find shelter off the beaten path. Too far, and the Taken will descend upon you.
- Bone of Hefnd #8 – Within the maze, stride spanning a pitfall, light calls through the window.
- Bone of Hefnd #9 – The Taken roil at cave’s bottom sends you to scurry over boulders into a ruined alcove.
- Bone of Hefnd #10 – Within a tunnel on the broken cliffs, brave the Taken storm.
Requiring multiple completions of the Warlord’s Ruin and lots of busy work, you’d think In the Shadow of the Mountain would give you a good reward. Unfortunately, it’s not worth doing, rewarding you with a random Exotic item and some bonus lore.

Destiny 2 Warlord’s Ruin loot table
The Destiny 2 Warlord’s Ruin loot table is as follows:
| Boss | Weapons | Armor |
| Rathil | Vengeful Whisper, Dragoncult Sickle, Indebted Kindness | Helmet, Arms, Legs |
| Locus of Wailing Grief | Vengeful Whisper, Naeem’s Lance, Indebted Kindness | Arms, Chest, Class Item |
| Hefnd’s Vengeance | Buried Bloodline, Naeem’s Lance, Indebted Kindness, Dragoncult Sickle | Helmet, Arms, Chest, Legs, Class Item |
While beating Hefnd’s Vengeance has a chance to drop every item from the Warlord’s Ruin loot table, farming Rathil is a great idea if you don’t have time or don’t want to do the full dungeon. Sure, you won’t be able to get the exclusive Exotic or the full armor set, but you will be able to earn Indebted Kindness, the best new Legendary weapon from the dungeon.
Check out the image above, provided by ‘Blueberries.gg‘, to a helpful infographic of the Warlord’s Ruin loot table.

Destiny 2 Warlord’s Ruin weapons
The Destiny 2 Warlord’s Ruin weapons are:
- Vengeful Whisper – bow (Kinetic)
- Indebted Kindness – sidearm (Arc)
- Naeem’s Lance – sniper (Strand)
- Dragoncult Sickle – sword (Strand)
Though four weapons might not sound like much, this is in line with previous dungeons. However, it’s the weapon categories themselves that are the most unfortunate. With a bow, sword, sidearm, and bow on the table, all of which are rather niche weapon types, there’s not a general-use gun to chase in the Warlord’s Ruin weapons list. That’s not to say these are terrible, however, it’s just a shame there’s not a more popular weapon type up for grabs, such as a pulse rifle or hand cannon.
The best weapon to farm in the Warlord’s Ruin loot table is Indebted Kindness. This sidearm is special because it’s part of a new archetype – rocket sidearms. Yes, it’s as cool and as powerful as it sounds in both PvE and PvP, dealing heavy damage even with its relatively poor handling.
Of course, we can’t forget about the dungeon Exotic weapon. The Destiny 2 Warlord’s Ruin Exotic is Buried Bloodline, an Exotic Void sidearm. Sidearms aren’t everyone’s favorite, but Buried Bloodline looks to kick things up by notch by firing rockets. That’s right, this crossbow ‘sidearm’ fires explosive tracking bolts that will leech health from the target. Furthermore, it’s expected to also grant the Devour effect, which will be great for Titans and Hunters which generally have a harder time triggering this effect compared to Warlocks.
You can learn more about this weapon in our dedicated Destiny 2 Buried Bloodline guide.
There addition of a brand-new dungeon Exotic isn’t all too surprising as this has been the case for every previous dungeon too.
For a refresher, here’s the dungeon Exotics from existing content:
- Gjallahorn – Grasp of Avarice
- Heartshadow – Duality
- Hierarchy of Needs – Spire of the Watcher
- The Navigator – Ghost of the Deep
This lined up with our predictions prior to release as, out of the dungeons currently in the game, there are two Heavy weapons and one Primary and Special Exotic weapon. Nevertheless, chasing the Destiny 2 Warlord’s Ruin Exotic will be the main draw once the post-launch buzz has died down.

Destiny 2 Warlord’s Ruin armor
The Destiny 2 Warlord’s Ruin armor is called Dark Age and can be earned from completing encounters in the new dungeon. This armor has a rugged, winter theme for each class. Given the setting of the new dungeon being inside a fortress in the ice-cold mountains of Earth, it’s certainly a fitting reward to earn for beating the numerous bosses and other encounters awaiting us.
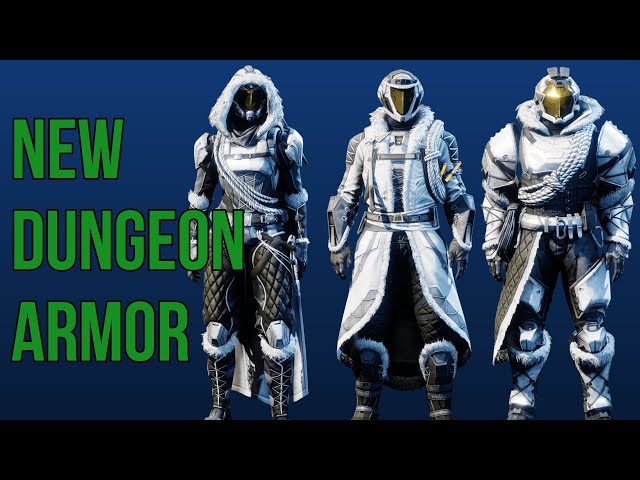
Digging into the design further, each Warlord’s Ruin armor set features climbing rope, ice picks and other survival gear, several fur accents, and gold visors by default. This further reinforces the hardy snow theme of the Warlord’s Ruin dungeon.
Overall, it’s a very rugged and tactical style, which is rather lacking in Destiny’s current selection of armors. However, it also doesn’t look all that glamorous. Given it’s a reward for taking part in one of the hardest pieces of content on offer, we were hoping the Destiny 2 Warlord’s Ruin armor would look more unique and eye-catching.

Likewise, given how focused the Warlord’s Ruin armor set is on this winter survival theme, it will be hard to pair this armor with other items. The helmets could easily work with other sets, but the arms and chest armor, especially for the Titan, are a challenge to work with if fashion is your end goal.
With that said, we’re looking forward to earning all of the Warlord’s Ruin armor sets, even if just to add them to the transmog system. We personally find the Titan and the Hunter to be the most unique of the bunch, with the Titans having an oxygen pack and built-in visor goggles, while the Hunter has two large ice picks crossed on their back.

Destiny 2 Warlord’s Ruin setting and story
Even with all the weapons and armor to collect, let alone the challenging encounters in store, the setting and story of the Destiny 2 Warlord’s Ruin dungeon is perhaps the most exciting aspect. Warlord’s Ruin takes us to a brand-new location – the castle of a warlord from the Dark Age in the EDZ.
What’s a warlord? Well, in Destiny’s lore, the Dark Age was a period in which Lightbearers (precursors to Guardians) fought against one another in a very territorial fashion, leading to these very powerful and dangerous warlords setting up shop inside fortresses. Eventually, the warlords were largely brought to justice and the Last City and the Vanguard were established. That’s not to say all the warlords were evil, however. For example, Shaxx sought to use his power to protect his people, rather than cause further suffering.
As you might expect then, the Destiny 2 Warlord’s Ruin dungeon gives us a good opportunity to learn more about this rather unexplored part of the Destiny universe.

Moreover, there’s now Scorn and even a new Ahamkara currently residing in the castle, which adds even more spice into the mix. A band of Scorn has set up shop in the fortress, using the bones of Hefnd, a dead Ahamkara, to wield powerful magic. This makes them a significant threat sitting right on our doorstep.
The Destiny 2 Warlord’s Ruin dungeon also keeps up Bungie’s knack for crafting stunning environments oozing with atmosphere. From the snow-dappled mountains that serve as your entrance into the castle to the dark, dank halls of this foreboding fortress, it’s one of the most visually striking and unique environments in Destiny to date.
One thing you’ll immediately notice is how medieval some areas feel, perfectly reflecting the thematic ties to the ‘Dark Age’ of Destiny. From large wooden doors, portcullis, battlements, and more, and even skeletons with swords lodged between their forgotten bones, it almost feels like delving into a different game entirely at times. We’re so used to sleek, sci-fi and fantasy settings like the Dreaming City or Neomuna that something medieval and rudimentary (yet still flexing Destiny’s sci-fi flare at times) is very refreshing.

One thing that wasn’t quite apparent before release was how Warlord’s Ruin story would tie into the main story of Season of the Wish. With Season 23 taking place in the Dreaming City, seeing Guardians recovering Riven’s last remaining eggs to strike a deal with the wish dragon with the end goal of pursuing the Witness, taking a detour to Earth seemed a little out of place. However, the aforementioned Scorn threat and an Ahamkara stirring up chaos in the shadows bring it all full circle – an Ahamkara is not to be trifled with, dead or alive. It’s our job to take out the Scorn threat and ensure that Hefnd’s bones don’t fall into the wrong hands.

How to access Warlord’s Ruin in Destiny 2
Destiny 2 Warlord’s Ruin opened to players on Friday, December 1, 2023, at 9 am PST / 12 pm EST / 5 pm GMT / 6 pm CEST. In terms of how to access the Warlord’s Ruin dungeon, you will unfortunately have to pay for it: it’s not included in the Season of the Wish pass, despite it being launched during Season 23. To access Warlord’s Ruin, you must either purchase the Lightfall + Annual Pass bundle or buy the Lightfall Dungeon Key separately, giving you access to both Ghost of the Deep from Season of the Deep and Warlord’s Ruin, the new Destiny 2 dungeon for Season of the Wish.
With Power level no longer being increased with each new Season, the new Destiny 2 dungeon, Warlord’s Ruin, doesn’t require you to grind levels before you can take part. Instead, your preparation all comes down to your equipment, rather than a level number.
So, that’s all there is to know about the Destiny 2 Warlord’s Ruin dungeon, including all the encounters, weapons, armor, and the story of the new dungeon. We can’t wait to enter the gauntlet of one of the best FPS games and, hopefully, come out the outside with our inventories full of loot. Be sure to check out the best PS5 controllers and best Xbox controllers if you’re taking on the challenge. After all, the last thing you want is your own tech getting in the way of dungeon delving.